reynolds wrap, wraps, photo by Jenny MacBeth

Grab-N-Go, Mexican Stuffed Wraps


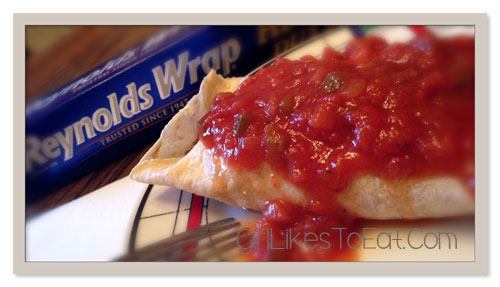
This recipe was created for a Reynolds Wrap contest. Bummer, I didn’t win. Boo hiss. I’m over it, but WTH, right?

The contest instructed to create a recipe using four ingredients from a list of foods they supplied, and of course, use Reynolds Wrap.

You can double the recipe and freeze it for those the Grab-N-Go busy days. I freeze for up to two months. My guinea pigs (aka co-workers) sure did like’em. You really can’t screw up the taste when cream cheese is melted inside. Yummy!

reynolds wrap, wraps, photo by Jenny MacBethYou Need

1 ½ pounds of 95% lean ground beef
1 (15 oz) can of black beans, drained
2 ears of corn on the cob, remove kernels from cob
1 cup of onion, diced
1 tablespoons of chili powder
1 (15 oz.) can of tomato sauce
1 (4 oz.) can of green chiles
zest from 1 small lime
2 tablespoons of cilantro, chopped
1 (4 oz.) Philly cream cheese
10 Flour Tortillas
2 cups of Mexican cheese, shredded
10 pieces of Reynold’s Wrap

Let’s get started…

Preheat oven to 350.

Brown ground beef in large non-stick skillet over high heat. No need to drain beef if you use 95% fat free. Reduce heat to medium and add black beans, corn, onion, chili powder, tomato sauce, green chiles, lime zest, and cilantro.

Mix it all together, cover skillet, and let it cook for 5 minutes over med-high heat.

Add in cream cheese. Stir constantly over med-high heat until cream cheese is melted.

Cut off a large piece of Reynold’s Wrap. Spray both sides of tortilla shells with cooking spray, and place in the center of Reynold’s Wrap. Repeat until all the shells are stuffed.

Add 1/2 cup of ground beef mixture to the shell and sprinkle with Mexican cheese. Roll up the tortilla shells, tucking in the sides. Place face down. Roll up with Reynold’s Wrap.

Place on a baking sheet and bake for 10 minutes. If you want to freeze a few, wrap it up as I mentioned, and put into a freezer bag. Grab one and cook it when you are ready to eat it.

Serve with salsa and sour cream and your favorite ale. Makes 10 tortillas.

So, I may not have won the contest, but I’d like to know what you think. Shoot me a message when you try it. Thank you.


Middle Eastern Hummus, Photo by Jenny MacBeth using iPhone 4S

Easy Hummus Recipe

As I mentioned on Facebook, I’ve never made hummus, so I researched online recipes. I’m sure you can agree, when you Google Hummus, it can be overwhelming. I just used the common ingredients; chickpeas, tahini sauce, and lemon juice, and added in some of my own yummies.

Since making it, the hardest part was deciding on the toppings. The flavor of hummus is like the color black; it goes with everything. You can use whatever your little taste buds desire.

A Facebook follower, Missy, piqued my interest with roasted red peppers. When I was at the grocer, I noticed a  jar of fried, marinated peppers. Grabbed it! I also diced up some Kalamata olives and walnuts. I left the toppings off for my guests to decide how to dress it.

Since I had eight cans of chickpeas in my cabinet, ah, er, a lot, I shared with all my friends (aka guinea pigs). I’ve also adjusted the recipe to fit a more reasonable party size. Tee hee!

Middle Eastern Hummus, Photo by Jenny MacBeth using iPhone 4SYou’ll need

2 (15 oz.) cans of chickpeas (garbanzo beans)
½ cup lemon juice, I used fresh squeezed
½ cup tahini sauce
As much garlic as you like. I used two cloves per can of chickpeas.
1 teaspoon of cumin
1 teaspoon of salt (to taste)
1/3 cup of extra virgin olive oil
Your favorite additions – roasted or fried red peppers, basil, pine nuts, paprika, crushed garlic, sliced almonds, diced onions, jalapeños, the list is endless.

Let’s get started…

Many recipes call for a food processor or blender. I have a immersion blender. It’s easy to clean, and one of my favorite kitchen tools.

Drain and rinse the chickpeas. In a large bowl, mix your lemon juice and tahini, until thick. Add in your garlic, cumin, salt, olive oil, and chickpeas. Now, you can mix in your additions at this point, or add just a little, or use for toppings. Decisions. Decisions. Just be creative. I used a jar of fried peppers and its juices, as a topper. You can’t go wrong with hummus. For years, I thought that it would be hard to make. People have told me that it’s difficult to balance the flavors. As long as you don’t go overboard with the lemon juice and salt, I don’t see any problems in ruining the taste. Okay! Perhaps you can screw it up, but if you take baby steps in your experiment, you can always fix it.

Whatever you decide, start to blend everything together. With using an immersion blender, you may need to add a little water, or olive oil to help get it smooth. It doesn’t have to be perfect. It will still taste yummy. Trust me.

Serve up with your favorite tortilla chips, crackers, and/or veges. Challenge: Try spreading hummus on a sandwich, or burger, or chicken, etc., and let me know what you think.

Enjoy!


Cast Iron Skillet, Sweet Fried Potatoes

Breakfast is my favorite meal. Mostly because I always have bacon. Since we moved into our new home, we’ve had overnight guests just about every weekend. Absolutely love a full house for breakfast served with mimosas.

This recipe is my sister, Donna’s. I’m also thinking that it’s a Pittsburgh thing because I know a lot of people who serve their fried potatoes with sugar and onions. It’s the best!

Cast Iron Skillet Sweet Fried Potatoes, Photo by Jenny MacBeth

You’ll need:

1/2 stick of real butter
1 (24 oz.) bag of fingerling potatoes, sliced
1/4 cup of brown sugar
1 1/2 cups of sweet onion, chopped
4 garlic gloves, minced
Sea salt and fresh ground pepper, to taste

Let’s get started.

Brown butter in cast iron skillet on medium-high heat. Once the butter is brown, stir in the potatoes and cook for three minutes.

Reduce heat to medium and add in the brown sugar, onion, garlic, salt and pepper. Keep tossing the potatoes until soft and onions are slightly blackened with a caramelized coating. This takes roughly five minutes.

Serve with your favorite breakfast eggs and bacon (of course). This is even great with your favorite dinner.

The cast iron skillet is the secret. I’ve made this same recipe in a non-stick skillet and they do not taste the same.

Do you use sugar in your fried potatoes?

Kale Salad with Dijon Dressing

Okay, kale, it’s green. IT’S GREEN. It’s also very bitter. This is the first time I’m eating it raw. I’ve had it cooked in butter, and that’s always a good thing. I read an article of the benefits of eating lots of kale. Which, I already knew, but it’s GREEN. It said that kale is king of green foods. It’s packed with calcium, minerals, vitamins, fiber and great for those detox’ers. I thought, “What the hell. Why not? I’ll just add my Dijon dressing to it, and all will be right.” All the while, keeping my fingers crossed.

Kale Salad, Photo by Jenny MacBethI took a few handfuls of chopped kale (about 2 cups). Since I didn’t have shredded carrots, I stole a few off the bunnies. Shhh! Buy a bag of shredded carrots, or julienne two small carrots.

Kale Salad, Photo by Jenny MacBethUse about 1/4 cup of parsley and sliced green onions. Add about two tablespoons of sunflower seeds, and one tablespoon of sesame seeds.

Kale Salad, Photo by Jenny MacBethSeason with ground sea salt and ground black pepper. My mistake, I was thinking, “This is going to be one bitter salad,” that I added too much salt. – Trust me, it’s so good that you only need a little.

For my Dijon dressing: Mix together one tablespoon of EVOO and Dijon. Add in one teaspoon of vinegar. – Whisk.

Kale Salad, Photo by Jenny MacBethDrizzle over the greens and toss. This salad is moan worthy.

Secret ingredient: Pair this salad with a Belgian Pale Ale, or even a Blue Moon.


Please share your ideas because this girl likes to eat.


photo by Jenny MacBeth

Shrimp Scampi Pasta


This is a continuation to our Mother’s Day dinner. This scrumptious pasta accompanied the beer braised baby back ribs.

The recipe is simple. My version was inspired by the Food Network Kitchens. Only, I added more garlic and lemon. I also bought already-cooked jumbo shrimp, and served it over Linguini. Because I served it over pasta, I increased the recipe.

Let’s get started…

Ingredients

31-40 count frozen cooked jumbo shrimp

1 pound of Linguini

1 stick of unsalted butter

2 garlic bulbs

1 1/2 cups of extra dry vermouth

2 lemons

1/4 cup of fresh flat-leaf parsley leaves

Lemon zest from one lemon

Sea salt and group black pepper

Directions

Thaw shrimp overnight in the refrigerator.

Cook pasta according to packaged instructions. I like it al dente; firm but not hard. It depends on how much pasta you are cooking, but for one pound, I cook it for about 10 minutes. After eight minutes, I start checking the pasta by removing a piece and taking a bite. When the pasta is done, drain and rinse with cold water and set aside.

Melt unsalted butter in a pan. Meanwhile, start to chop up your garlic and parsley leaves, and zest your lemon. Once the butter is melted, add garlic and cook for a few minutes, or until it starts to brown.

photo by Jenny MacBeth

Pour in your vermouth and squeezed lemon juice. Bring to a boil.

photo by Jenny MacBeth

Food Network says to use a wooden spoon to help scrape up the brown bits from the bottom of the pan. I’ve found this works the best.

Stir in the lemon zest and parsley. The sauce is done.

Toss the pasta, shrimp and sauce all together right before you are ready to serve. If you do it too soon, the pasta will suck up all the juice and become dry.

Grate fresh Parmesan over the pasta and garnish with parsley.

photo by Jenny MacBethCooking the pasta takes longer than the sauce, and it’s amazing. I really enjoy this dish, especially, with a crusty bread.

Next up, the dessert. Stay hungry.


bruschetta finished, photo by jenny macbeth

Bruschetta Dip. Great for Parties.


WOW your friends with this cool and easy dip. It’s awesome for picnics.

This yummy idea was inspired by, Monica Sieber from Pittsburgh, PA. Thanks girl. We love it!

diced tomatoes, basil, garlic, cream cheese, photo by Jenny MacBeth

You’ll Need:

3 (14.5 oz.) cans of diced tomatoes

2 (8 oz.) bricks of cream cheese

8-10 garlic gloves, crushed

1 cup of fresh basil, chopped

2 Tablespoons of balsamic glaze

3 Tablespoons of extra virgin olive oil

Sea salt and pepper

Let’s get started…

hunts diced tomatoes, photos by Jenny MacBethSlightly drain the diced tomatoes.

chopped basil, photo by Jenny MacBethChop up the basil. I just love chopping fresh herbs. It makes our house smell so divine. Even our bunnies come running out to the kitchen to see what I’m making.

crush garlic, photo by jenny macbethIn a large bowl, toss in the tomatoes, basil and crushed garlic.

balsamic glaze photo by jenny macbethAdd in the balsamic glaze and olive oil. Season with some sea salt and fresh ground pepper and mix.

spread out cream cheese and mixture, photo by jenny macbethSpread the cream cheese over the bottom of an eight inch round dish, or any type of shallow serving platter. Pour your mixture over the top of the cream cheese.

bruschetta finished, photo by jenny macbethSlice down a baguette loaf. No need to toast the bread or bake the dip. It’s ready.

Hint: This dip tastes better the longer it sits, so you can prepare it the night before.

YUMMY!

Any cool ideas? Please share because this girl likes to eat.


photo by Jenny MacBeth

Ranchero Chicken Muffins


The foundation of my recipe was inspired by Tablespoon.com. They always have cool ideas, and I love this recipe. I used Tablespoon’s Mini Tex-Mex Chicken and Cheese Pies as a foundation, but of course, I made my own version.

You’ll need

Featured by

ranchero chicken muffins featured by Bisquick

2 (13 oz.) cans of Chicken, drained

1 1/2 cups of shredded Low-Fat Monterey Jack Cheese

1 (4.5 oz.) can of Green Chilies

1/4 cup of low-fat Hidden Valley’s Buttermilk Ranch Dressing

1/4 cup of cilantro

1 green onion, finely chopped

1/2 of lime juice, freshly squeezed

For the batter

1/2 cup milk

2 eggs

1/2 cup of Bisquick

photo by Jenny MacBethLet’s get started…

Preheat the oven to 375.

Using your hands mix together the chicken, cheese, chilies, ranch dressing, cilantro, onion and lime juice.

In another bowl, whisk together the batter.

photo by Jenny MacBethI used a silicone muffin pan. LOVE it! If you use a tin pan, you’ll need to use cooking spray.

Pour a tablespoon of the batter into each muffin cup. Then place about two tablespoons of the chicken mixture in each cup. Then spoon over the mixture two tablespoons of the batter as demonstrated above.

Bake for 40-45 minutes, or until a toothpick is clean when inserted.

photo by Jenny MacBethServe it with salsa, sour cream, or ranch dressing for dipping.

I’m also making a Tuna Melt version with homemade potato chips using Old Bay seasoning. Yummy!

These yummy muffins freeze and reheat well. – Great for grab and go lunches.

Let me know what you think because this girl likes to eat.


Magic Hat Black Lager Dark Chocolate Pasta Sauce


When creating a name for the recipes, I want to use every ingredient. All of those sound scrumptious.

It’s Friday night happy hour at my house. Grabbed me a Magic Hat (or 2), and turned on Pandora’s Foreigner station. It’s not all Foreigner. It’s a mix of Journey, Bon Jovi, and a few others similar to the era.

Good times…

My friend Cheri asked me to try something using dark chocolate and beer, so I came up with this…

Magic Hat Black Lager Dark Chocolate Chili Sauce, Photo by Jenny MacBethAdding dark chocolate (DC) and a lager to red sauce dishes give the recipe an amazing lift to hearty goodness. You might think that adding DC would make the food sweet, but if you use an 82 percent cacao bar, you will be amazed. Not to mention, this recipe is spicy. Glen’s not a fan of DC, but really enjoyed this plate of happiness. He said, “This is interesting in a good way!”

Next time you make chili, pasta sauce, really, any red sauce dish, add in a little DC. I dare you.

You’ll need…

1 pound of pasta (whatever you fancy)

1/2 stick of butter

4 chicken breasts

4 shallots (finely chopped)

1.5 tablespoons of red pepper flakes

1/4 cup of real bacon

24 ounces of no salt added tomato sauce

1/2 cup of Magic Hat Black Lager

1.5 ounces of 82% cacao (about 1/2 of a dark chocolate bar)

Fresh ground pepper

Sea salt

Parmesan (freshly grated)

A bunch of fresh sage (chopped)

Loaf of Pain de Campagne

Time to get the party stared…

ingredients, photo by Jenny MacBethHere are ‘some’ of the ingredients. By some, I mean, I thought I had all the ingredients set up for the photo shoot. As I was preparing the sauce, I had realized that I didn’t. Oh well. The problem is that I got so excited, it slipped my mind.

Use real bacon crumbles. I’m a big fan of fresh everything, but using the bacon-already-crumbled-in-a-bag helps save time, especially, when you are coming home from a long work day.

Also, I like Hunt’s ‘no salt added’ tomato sauce. This is a salty recipe to begin with, so you want to pull back on it where you can. The recipe calls for 24 ounces – I used three 8 ounce cans.

If you haven’t had Magic Hat Black Lager, I suggest you do. Especially, if you like Guinness. I usually use Guinness in my red sauce foods, but I wanted to try it. It’s perfect to eat and drink.

I have no idea why I put a can of tomato paste in the shot. I’m laughing my ass off. Again, excited to get cooking, I must have grabbed the wrong can for the picture. I assure you that I didn’t add it to the sauce. The sauce is already thick and does not need more oomph from the paste.

seasalt-boiling-water, photo by Jenny MacBethFirst up…

Boil the water. Add in a little salt. I’m a big fan of sea salt and so happy that they came out with an iodized version.

pasta-boiling-water, photo by Jenny MacBethAdd in 1 pound of whole grain pasta. Boil for about 10 minutes. – I like my pasta al dente. Drain, rinse, and set aside.

butter-melting, photo by Jenny MacBethIn the same pasta sauce pan, melt your butter over a medium-high heat.

chicken-butter, photo by Jenny MacBethAdd your chicken breasts. I use thin-cut breasts. They cook up in half the time. I’m also a worry-wort about, “Is my chicken cooked?”. No need to worry with thin-cut.

Add some fresh ground pepper and a dash of sea salt. Brown the breasts on both sides for two minutes.

shallots, photo by Jenny MacBethOnce the chicken is a little brown on both sides…

Add in your diced shallots, and red pepper flakes. Turn the heat to medium and let it all mingle for five minutes, or until the shallots are transparent, and the chicken is cooked thoroughly.

Remove chicken, cover, and set aside.

Stir in the bacon, tomato sauce and beer. Let it cook for two more minutes.

spices, photo by Jenny MacBethFresh Parmesan, red pepper flakes and sage. These are the ‘other’ ingredients that I forgot to add in the picture above. I’m kind of glad I did – it’s a nice photo. If I do say so myself.

adding-chocolate, photo by Jenny MacBethStir in the cacao and a little grated Parmesan. Let it melt into bliss…

sauce, photo by Jenny MacBethCook for another 2 to 3 minutes.

Time to plate it…

Plating, photo by Glen Green PhotographySome people like to mix their pasta in the sauce first. This sauce is heavy, so, I recommend you don’t.

Layer a chicken breast over the pasta…

toppings, photo by Glen Green PhotographyAdd a layer of sauce, then fresh grated Parmesan, then top it off with a few sprinkles of diced fresh sage. Delicious!

Pain de Campagne, photo by Jenny MacBethSince the chocolate in this recipe reminded me of a French dish, I used a loaf of Pain de Campagne. All breads are cool in my book, but this was perfect for this dinner.

This recipe is gourmet, and when we think gourmet we think, “A long time to prepare.” I have to tell you, this took less than 30 minutes. Magic!

Do you have any cool ideas you want me to cook up? Please share because this Girl Likes to Eat!


spicy sesame noodles with Sake

Spicy Sesame Noodles or Green Beans


This is a great sauce you can use on noodles or even green beans.

spicy sesame noodles with Sake

spicy sesame green beans

You’ll Need

1 pound of fettuccine or linguini style noodles (or 2 pounds of french cut green beans)
4 tablespoons of roasted sesame seeds
4 tablespoons of sesame oil
1 tablespoon of Chinese chili paste (optional if you do not like the heat)
2 tablespoons of low-sodium soy sauce
4 large garlic cloves, crushed

Let’s get started…

Green Beans

Using a medium size sauce pan, bring 1/3 cup of water (enough to cover the bottom of your pot) to a boil with some sea salt.  Add your green beans. Boil for one minute covered. Turn off burner and let it sit covered for one minute. We want to blanch the beans. This keeps the beans crispy.

Drain and rinse with cold water.

Noodles

Boil your pasta to your liking. I like it al dente. It usually takes six to eight minutes per pound of fettuccine or linguini.

Drain and rinse with cold water.

Sauce

While your beans or noodles cook, mix together the sesame oil, chili paste, soy sauce and crushed garlic.

Once your beans or noodles are ready, toss in the sauce and sesame seeds.

You can eat this warm or cold. If you serve it cold, chill for about an hour.

Easy, yummy and spicy. Just how I like my men.


#GL2E
final citrus ale summer pasta salad

Citrus Bluemoon Summer Ale Pasta Salad


This is definitely a unique and delicious pasta salad if I do say so myself. That, or it’s the two beers I drank whilst making this. Ha!

Tip

You can prepare everything in advance, however, mix it right before serving. Not sure why, but it tastes best the first day.

You may not want to use all the dressing. I suggest you gradually pour it while mixing your salad. You can decide how much is enough.

Salad Ingredients You’ll Need

1 cup of Bluemoon Summer Ale
3 tablespoons of shallots, minced
1 teaspoon of finely grated orange zest
1 tablespoon of honey
1 teaspoon of Dijon mustard
4 tablespoons of EVOO
1 pound of your favorite pasta, I used Rotini
1/2 cup of green onions, chopped
1/2 cup of pecans, chopped
1/2 cup of Kalamata olives, seeded and chopped
1 cup of Roma tomatoes, chopped
1 can of oranges, drained
1 cup of Mozzarella cheese, grated
Sea salt and ground pepper to taste

Let’s get started…

Grab a beer or seven, and turn on Pandora.

The Dressing

In a small bowl, whisk the beer, shallot, orange zest, honey, mustard and oil. Or, if you have a shaker, that would be best. Season the dressing with salt and pepper to taste. This can refrigerate up to three days. I wouldn’t push it any longer. Homemade dressings can get funky, awfully quick. Especially, without having the added preservatives.

Removing the tomato centerWhen I use tomatoes in salads, I remove the center with a spoon. This helps to keep your salad from getting watery.

adding dressing to pasta saladIf you do not have time before serving, chop up everything ahead of time and store in your refrigerator. Right before serving, toss all your ingredients in a large bowl. Slowly pour the dressing over the top and mix it all together carefully.

adding cheese to pasta saladTop it off with Mozzarella cheese.

final citrus ale summer pasta saladDone! This salad does not take much time at all. Particularly, while drinking a beer.

You can also add in spinach or other vegetables. Play with it!

I would love to hear from you. Contact me because this girl likes to eat.

#gl2e